Purpose
This page provides basic information regarding the EMG hardware and software for the MEGA-TMS machines used for VERIFY.
When your MEGA-TMS unit first arrives you’ll want to ensure the software was installed correctly, and with the VERIFY settings installed. Your TMS unit should have been delivered with the VERIFY template already installed, in which case the home page should look similar to the image below. If your home page looks different then it indicates the VERIFY settings have not been installed and must be done manually, which is a fast and simple process. The VERIFY settings to download as well as instructions for installing them are found in the links below. These can also be found on the Resources page.
We have had a few instances to date where the laptop supplied with the MEGA-TMS machine has experienced errors and become unresponsive when trying to use TMS with VERIFY patients. Unexpected and lengthily Windows updates can also occur when trying TMS with VERIFY patients. For these reasons we recommend installing the MEGA-TMS software and settings on a second laptop at your site in case of emergency.
The MEGA-TMS Software and VERIFY Settings can be downloaded from either of the following links:
Instructions for Installing MEGA-TMS Software and Settings – Should be used if you need to reinstall the MEGA-TMS software on the supplied laptop or install the MEGA-TMS software on a new laptop. If you cannot access the PDF for any reason the instructions can also be found at the bottom of this page.
Instructions for VERIFY Laptop Hard Reset and Software Installation – Should be used if the VERIFY laptop is running extremely slowly or takes an extended period of time to load past the black start-up screen when you turn the laptop on.
Here are links to the manuals for the EMG system and the TMS unit. You can download and keep these manuals. They are also stored on the Resources page.
MEGA-TMS Trolley Assembly Manual
MEGA-TMS Machine Shipment and EMG Supplies
When you receive your MEGA-TMS machine it should come with the TMS machine itself, a TMS coil, a laptop, a trolley, one pack of disposable electrodes, a grounding strap, and EMG leads. Please note you will not receive a coil holder or foot pedal as these items are not needed for MEP status determination, despite them being mentioned in the MEGA-TMS manuals and set-up instructions.
The disposable items needed for TMS such as the razors, alcohol wipes, and prep tape are not supplied with the MEGA-TMS machine and need to be purchased by each site. Further electrodes will also been to be purchased by each site. For TMS with stroke patients the costs for these items are covered in the per patient payments, while disposables for healthy volunteers are covered by the set up payment(s) that sites receive.
- There is no mandatory brand of electrodes to use but we recommend using these 3M electrodes or something similar. It says they’re pediatric but they still work for TMS, and they work with the electrode cables that came with your MEGA-TMS machine.
- If you want to buy more of the electrodes that were shipped to you with the MEGA-TMS machine please get in contact with the TMS distributor Soterix Medical who can provide further information.
- You should be able to use the alcohol wipes that your hospital already uses currently
- After using an alcohol wipe to clean the skin where the electrodes will be placed you should use either prep tape or skin prep gel to lightly abrade the skin.
- For prep tape we recommend using 3M prep tape. This link is for the New Zealand website so you will need to find a local distributor for it.
- For skin prep gel we recommend using the Nuprep skin prep gel. To use it you put a little bit of the gel on a paper towel and lightly abrade the skin where the electrodes will be placed.
- Any brand of disposable razor will work.
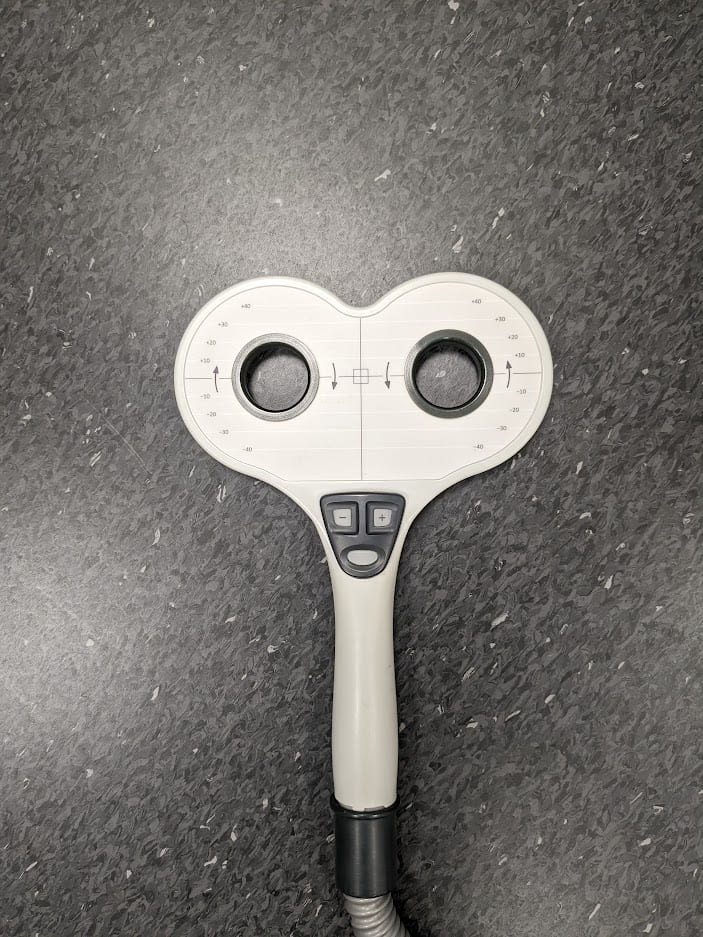
The TMS coil you receive should look like the one below, please contact the VERIFY TMS team if the coil you receive looks different.
MEGA-TMS Unit Power Supply
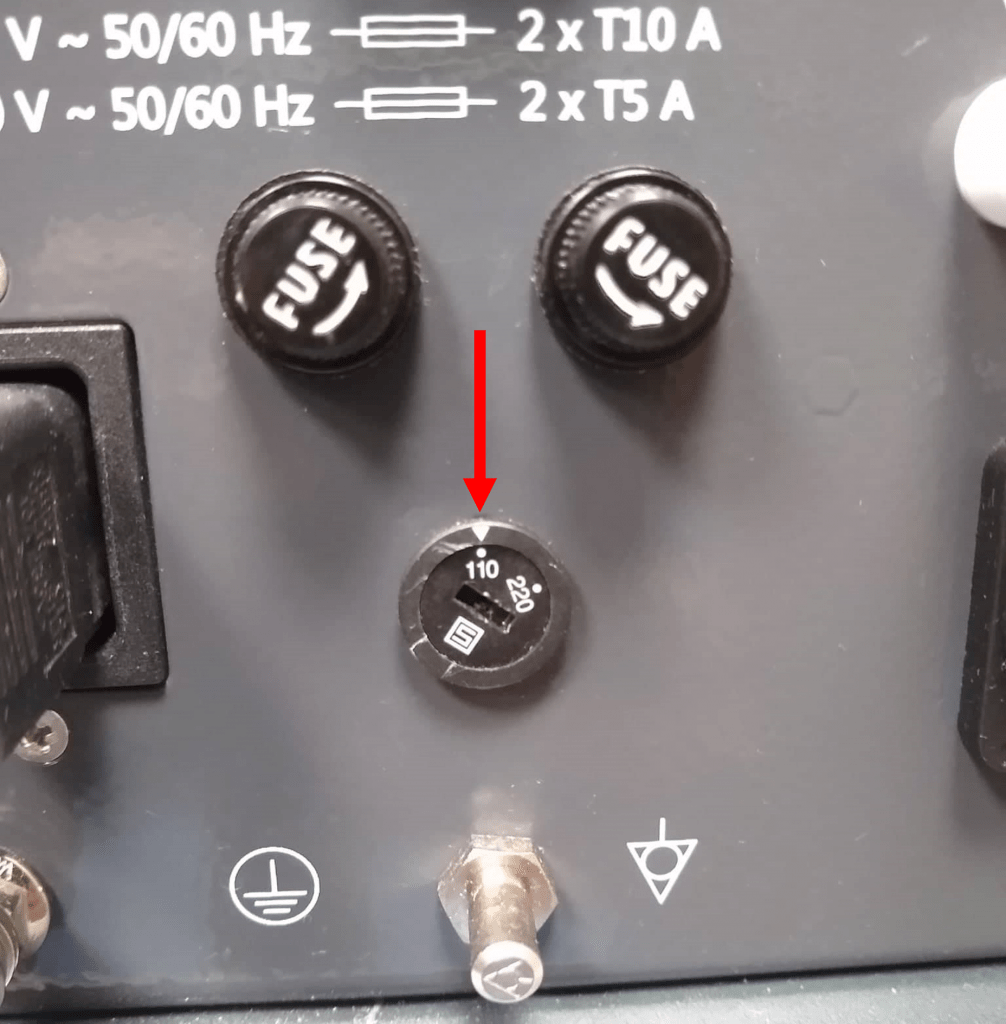
Check on the back of the TMS unit for a switch that lets you choose between 110 V or 220 V electricity supply.
Make sure this switch is set to 110 V for the US. If the switch is set to 220 V you will likely be unable to use the MEGA-TMS machine at stimulator intensities greater than 60%. The picture below shows where to find the switch on the MEGA-TMS machine.
MEGA-TMS EMG System
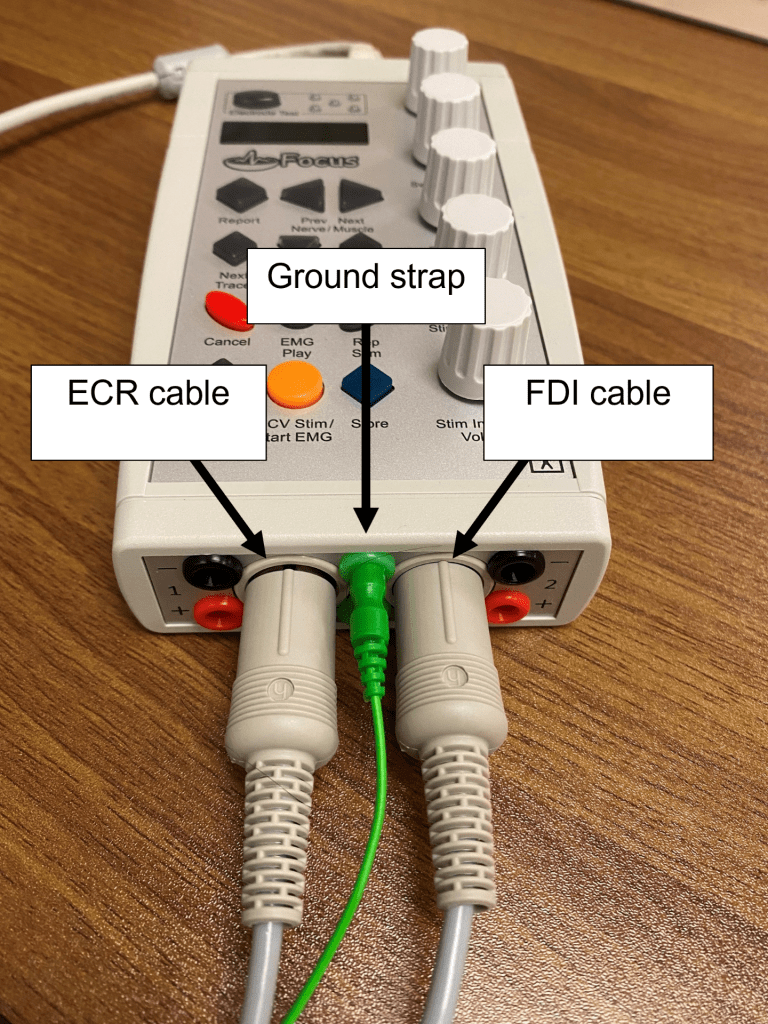
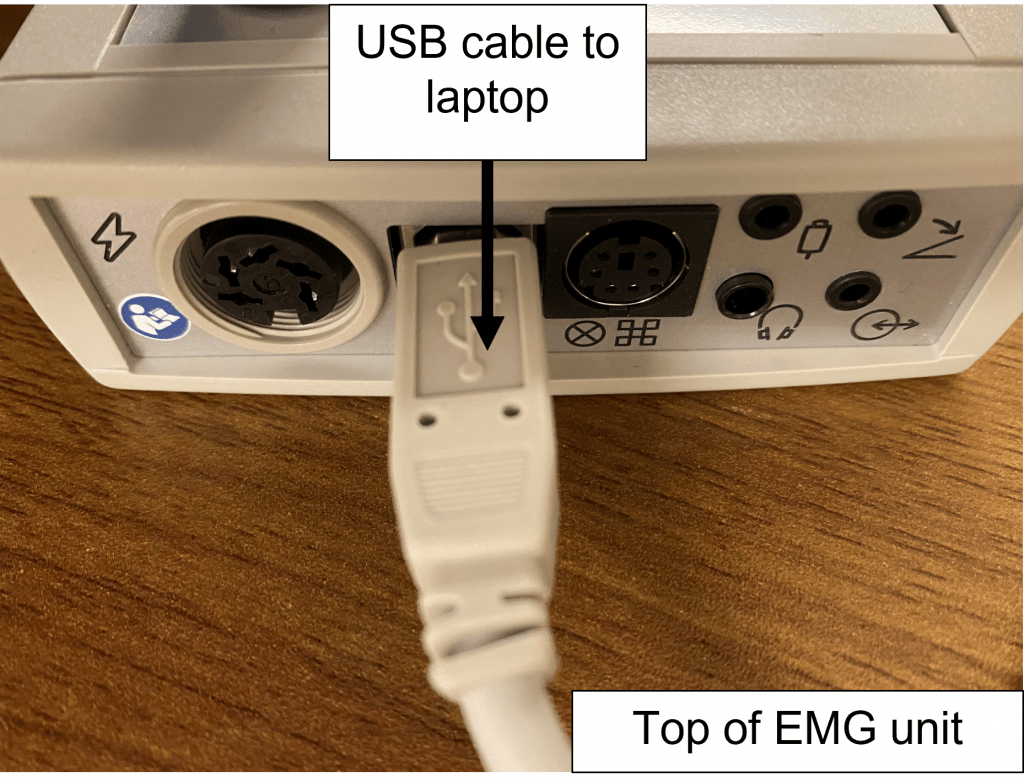
The pictures above show how the cables should be connected to the EMG unit.
No buttons on the EMG unit need to be used during TMS sessions
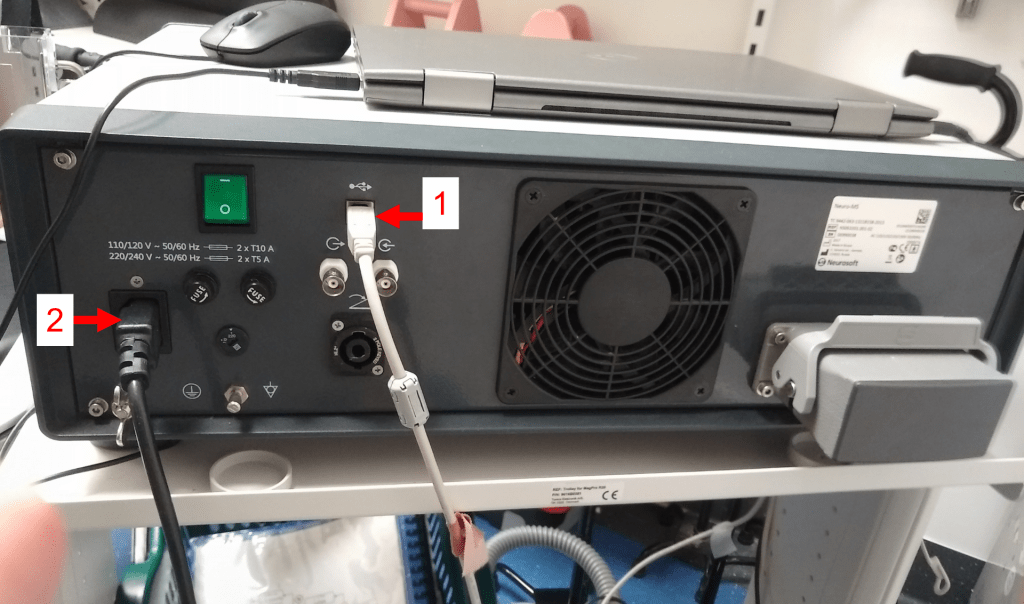
- This cable connects the MEGA-TMS stimulator with the laptop. The other end of this cable should be plugged into a USB port on the laptop
- This is the power cable. The other end of this cable should be plugged into a power outlet.
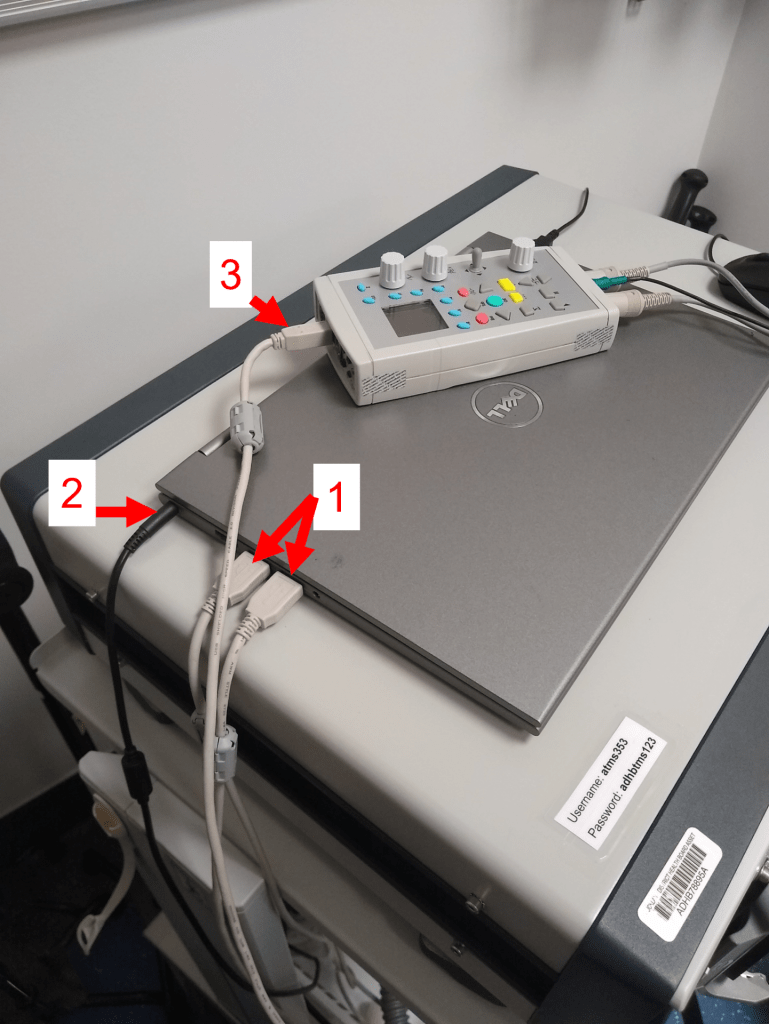
- These are the USB inputs into the laptop. One of these cables will be coming from the MEGA-TMS stimulator, and one will be coming from the EMG unit.
- This is the laptop power cable. The position of it may differ on the laptop supplied to you.
- The cable connecting the EMG unit with the laptop.
MEGA-TMS EMG Software
The pictures below explain the role of the important buttons in the MEGA-TMS EMG software.
Home page
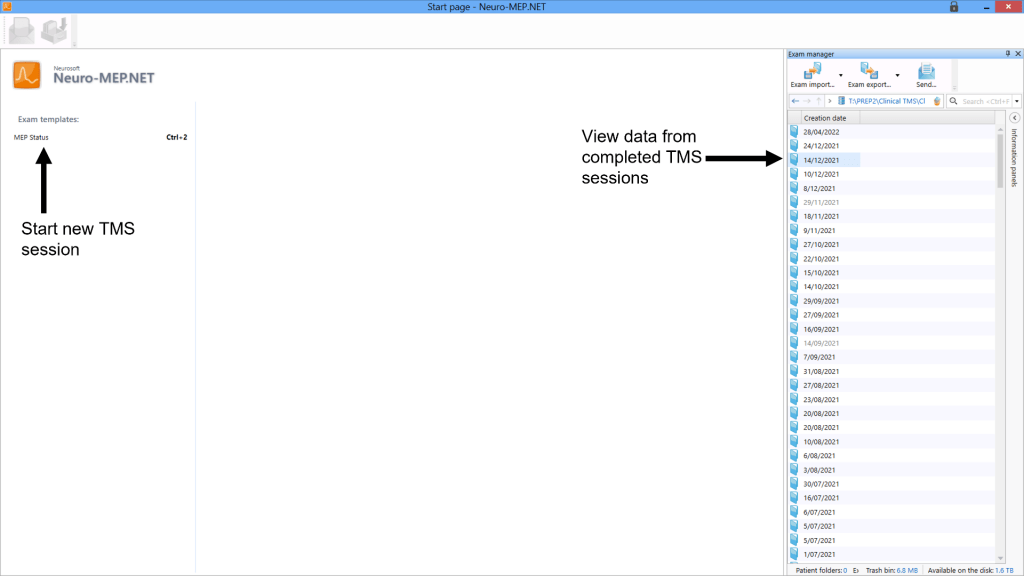
1. Pressing the “MEP status” button will start a new TMS session and you’ll be prompted to enter the participant’s code. Ignore where it asks about adding a picture from a camera. TMS sessions in the MEGA-TMS software are referred to as exams.
2. Data from saved TMS sessions can be opened by double clicking them on the right side of the screen. Single clicking files and pressing “exam export” will export all frames from the TMS session, and this exported data should be uploaded to REDCap for healthy volunteers or WebDCU for stroke patients. Selecting multiple files and pressing “exam export” will export all data into a single file that can be uploaded.
TMS Session page
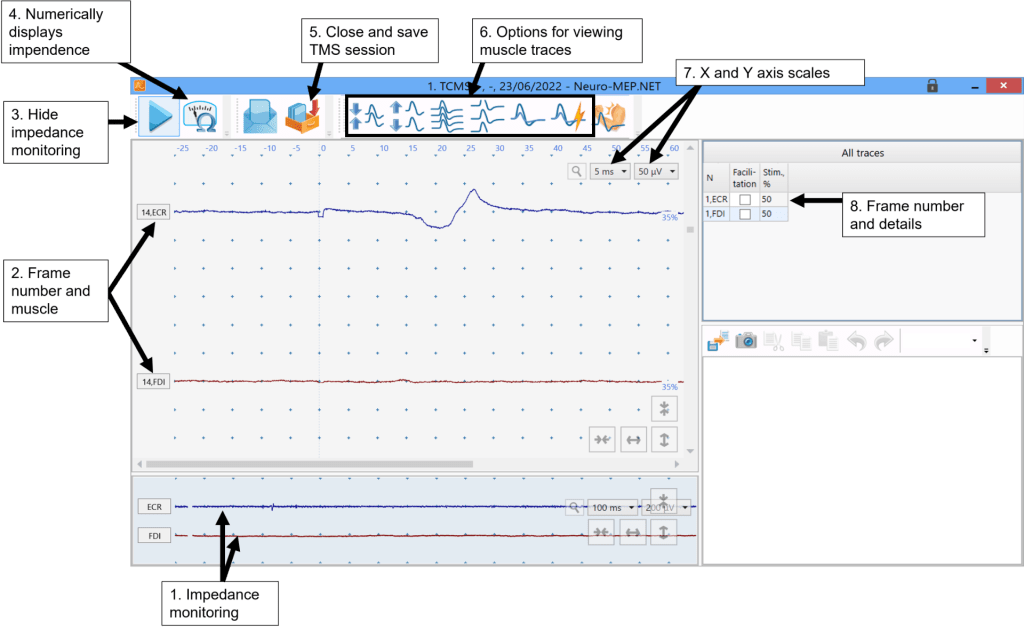
1. Impedance monitoring displays how much noise is present in the traces for each muscle in real-time. Before any TMS is delivered these should be flat lines as shown in the picture because this indicates the traces are free from biological and non-biological noise. The presence of noise should also be checked throughout the TMS session by observing the EMG traces. Please see the EMG Technique module for how to determine whether noise present is biological or non-biological. Changing the y-axis scale for impedance monitoring from 200 microvolts to 50 microvolts can be useful for troubleshooting noise issues. The buttons for changing the y-axis scale can be found in the top right corner of the impedance monitoring window. Impedance monitoring is also useful for ensuring the EMG cables are attached to the correct muscles. Once the EMG cables are connected to electrodes on the participant you should ask them to extend their wrist. This should cause a spike in EMG activity in the blue trace labelled ECR only. If the spike in EMG activity occurs in the red trace labelled FDI you know the cables need to be swapped between the muscles. It’s also useful to get the participant to abduct their index finger to ensure the FDI is wired up correctly also as this should cause a spike in EMG activity in the red FDI traces. If the patient has no active wrist extension or index finger abduction you will just need to make sure you’ve connected the cables correctly according to the images near the top of this page.
2. The top trace shows the EMG trace for the ECR muscle, and the bottom trace shows the FDI muscle. The number before the muscle name indicates the frame number, which in this example is frame 14.
3. Starts/stops impedance monitoring displaying at the bottom of the screen. If monitoring is turned off then each EMG trace should still be checked to make sure there is no biological or non-biological noise present.
4. Pressing this button will show you the impedance as a numerical value for each muscle. Good impendence is indicated by a green circle. If impendence is too high you need to determine if the issue is due to biological or non-biological noise and then attempt to troubleshoot it.
5. Closes and gives the option of saving the current TMS session. Should only be used at the end of the TMS session.
6. These buttons provide different ways of viewing the EMG traces such as changing the distance between traces, superimposing all traces together, or viewing all traces on the same window. These buttons are not necessary to use but can be helpful for determining MEP status.
7. Used to change the X and Y axis scale if desired. By default the x-axis is set so one unit on the screen is 5 ms, and the y-axis is set so one unit on the screen is 50 microvolts. We recommend not changing the scales during the TMS session.
8. Information for each trace are shown on the right of the screen, and the most important detail is the stimulus intensity used. To see further details for every EMG trace press CTRL + U.
Do not worry about the buttons on the screen not explained here, you shouldn’t need them for the VERIFY TMS sessions.
MEGA-TMS Traces Viewing Options
The short video below summaries how changing the visualization of EMG traces in the MEGA-TMS software can assist with MEP status determination. Please note the closed captions were automatically generated and are highly inaccurate.
MEGA-TMS File Export
Once a TMS session is completed it should be saved and closed. All TMS traces now need to be exported. Please follow the instructions below for how to do this.
On very rare occasions TMS data may not save correctly in the MEGA-TMS software. Please ensure that when you finish a patient TMS session and save the data, that you quickly open and check the data looks correct because if the data didn’t save correctly or traces are missing then you can quickly re-test the patient as they are still present and prepped for TMS.
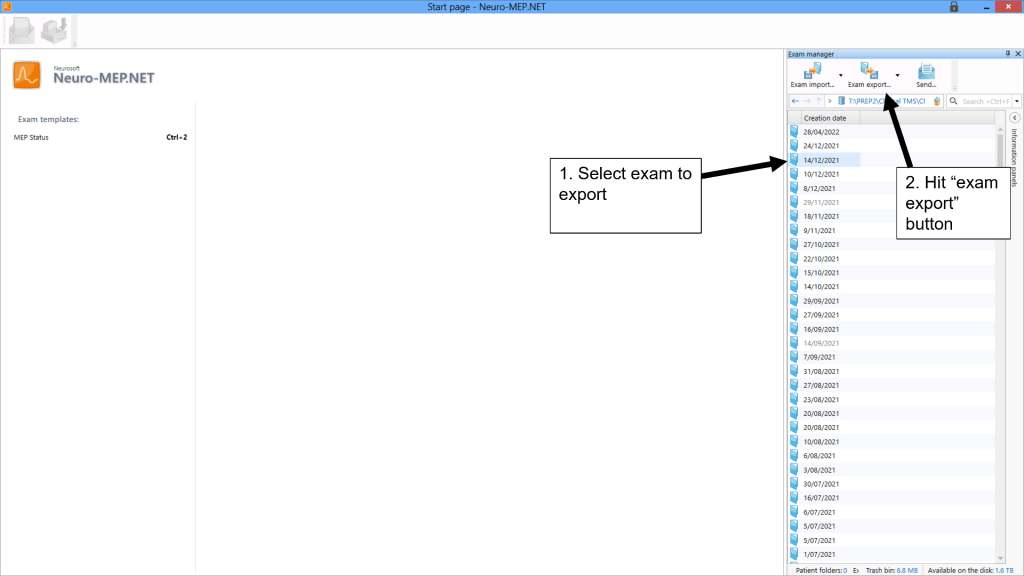
1. Go back to the MEGA-TMS home screen and select the TMS dataset, which is called an exam in the software, that you want to export. If there are multiple datasets select them all and export them together as this will put them all into one file.
2. Hit the “exam export” button and choose where to save the file. The data should be saved as a .NSPACK file which is the only available option.
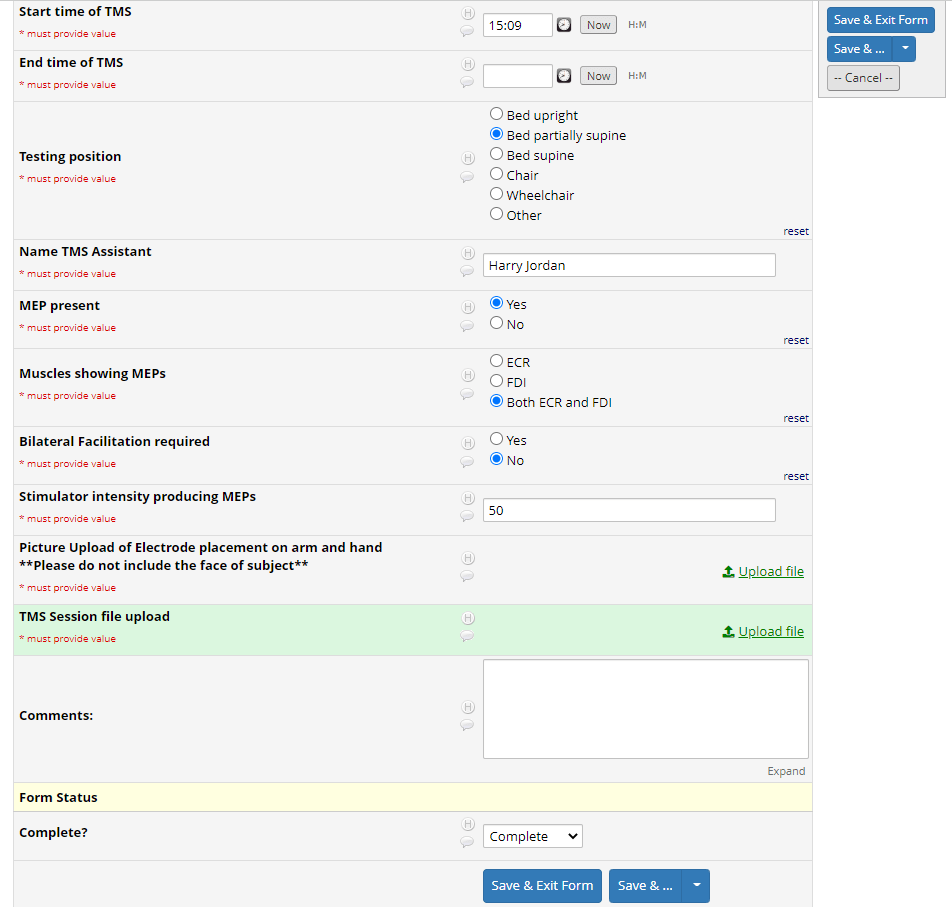
3. The exported file will contain all the TMS traces from the session. This is the file that should be uploaded to REDCap for healthy volunteers or WebDCU for stroke patients. The green highlighted area in the picture below shows where the TMS data should be uploaded for REDCap.
Instructions for Installing or Updating MEGA-TMS Software and Settings
The MEGA-TMS Software and VERIFY Settings can be downloaded from either of the following links:
The MEGA-TMS software file is called Neuro-MEP.NETomega.
The VERIFY settings file is called VERIFY Settings+. There may be a version number after the +.
If you already have the MEGA-TMS software and VERIFY settings installed and want to update to newer versions, follow all steps.
If you are installing MEGA-TMS software and VERIFY settings on a new device, follow steps 3-6.
If you already have the MEGA-TMS software installed and want to update the VERIFY settings, download the settings from the Dropbox link above then perform step 6.
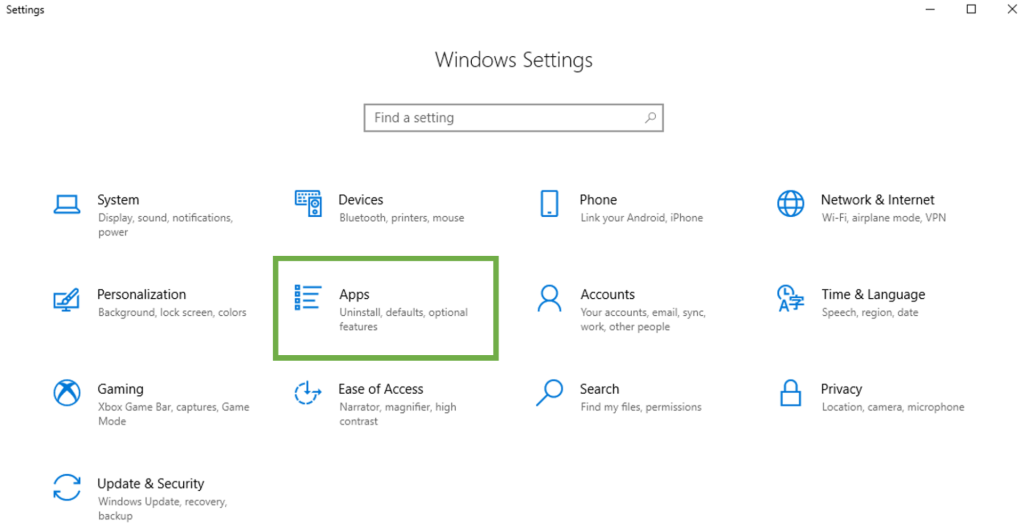
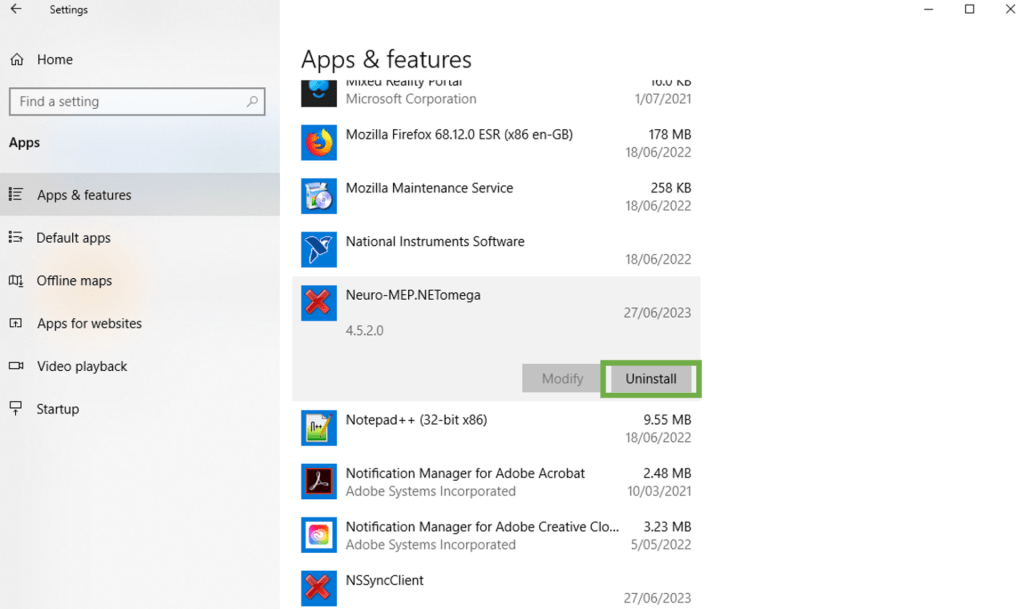
1) Uninstall Neuro-MEP.NETomega
Prior to downloading the new software and settings, uninstall the one that is currently being used on the computer. The following steps and corresponding screenshots show the process.
On the computer, go to Windows Settings > Apps > Find Neuro-MEP.NETomega > Uninstall.
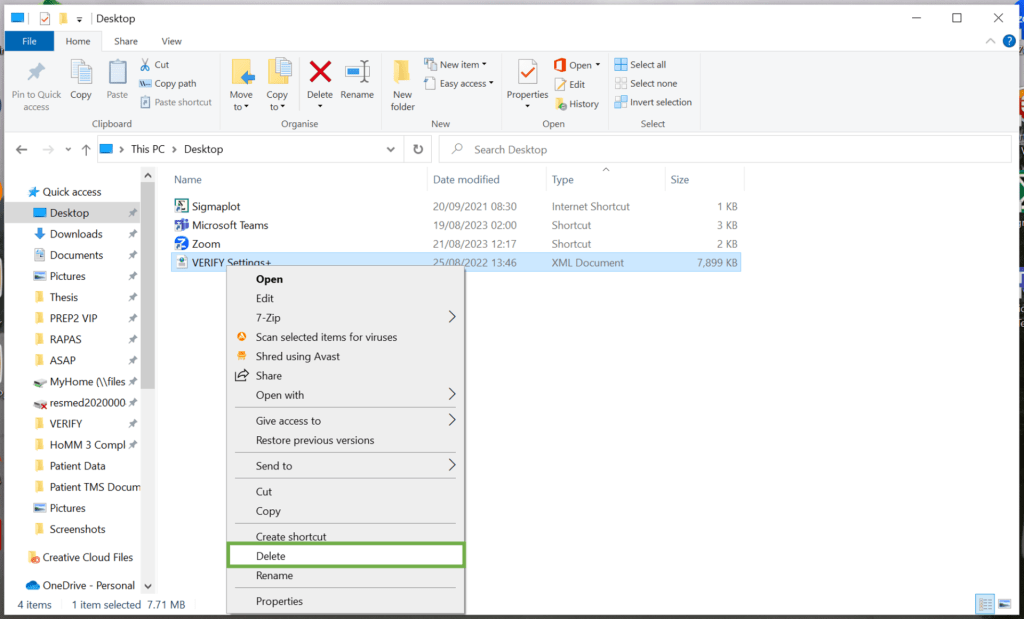
2) Delete current settings file
Locate where you saved the current VERIFY settings file, right click the file, and delete it.
3) Download the MEGA-TMS software and VERIFY settings
Both the software and settings can be downloaded from the Dropbox links at the start of the instructions.
4) Install the Intel IPP Library version 8.1
Install Intel IPP Library version 8.1 by going to the computer’s Download folder > double click ipp81_runtime_setup. This is needed for the MEGA-TMS software to run correctly.
A popup will appear where you must select YES to proceed with the installation; however nothing else will popup after pressing YES.
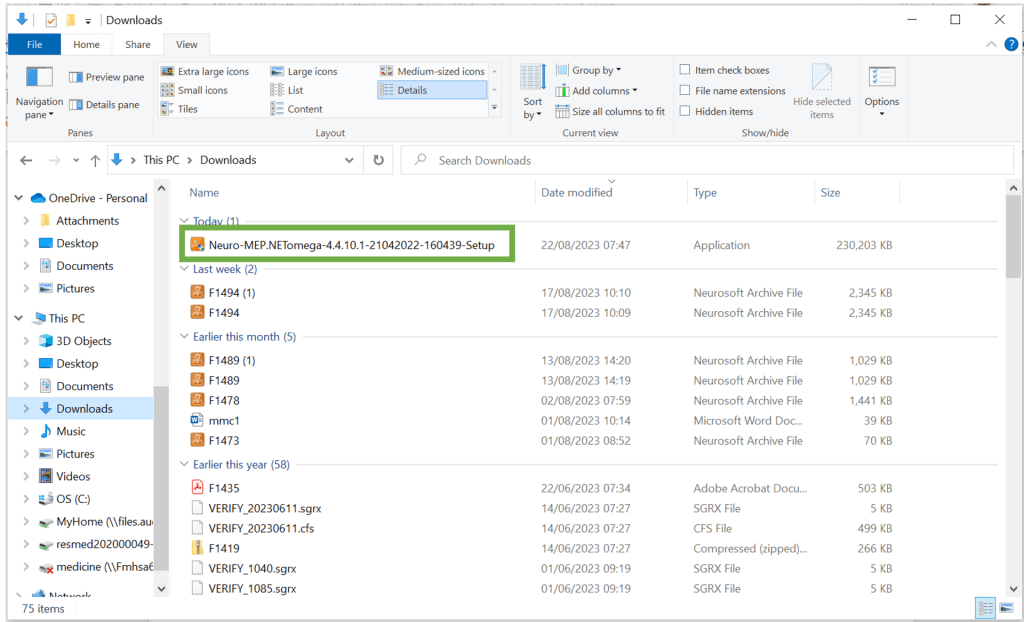
5) Install the Neuro-MEP software
Install the MEGA-TMS software by going to the computer’s Download folder > double click Neuro-MEP.NETomega-4.4.10.1-21042022-160439-Setup.
Follow the instructions on screen and click next until the installation is complete. It may take a minute for the installation instructions to appear.
6) Load the VERIFY settings
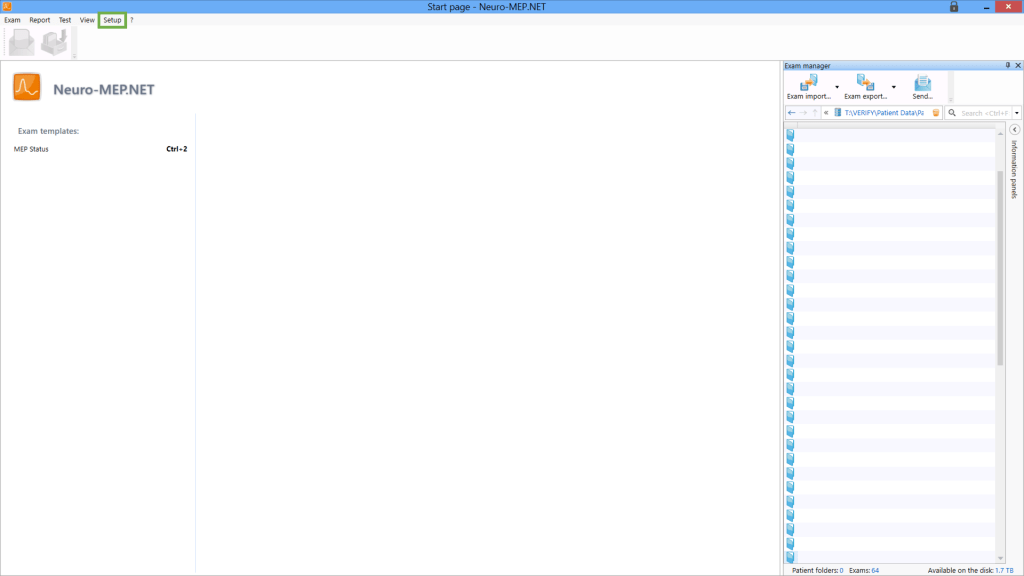
Once the MEGA-TMS software is installed, start the Neuro-MEP.NETomega program.
![]()
To load the VERIFY settings, in the top left of the screen go to Setup >> Load >> and then select the Verify Settings+ file. If the setup button is not visible on the home page then click on the orange box in the very top left corner of the screen.
Once the new settings have been loaded, the software will restart with all the desired VERIFY settings. The software can now be used to collect TMS data. Your home page should look similar to the home page in the picture above if the settings were installed correctly.