Purpose
To provide an overview of the protocol for using TMS to identify the MEP status of patients enrolled in the VERIFY study. A copy of the protocol on this page can be downloaded here.
Patients consented to VERIFY will complete TMS testing at Visit 3, Hour 72 – 168 after the stroke.
A participant is considered enrolled only after starting first TMS stimulation or starting study-specific MRI sequence.
Whether you are new to TMS, or highly experienced, the way you approach the test has a large influence on the patient’s experience. If you express feelings of uncertainty or concern about the test, then they will too. Remember that TMS is a safe, painless technique that is well-tolerated, even by people at the acute stage of stroke. Being confident and calm will make TMS a straightforward test for everyone involved.
Note that the TMS protocol does not include neuronavigation assistance, and neuronavigation should not be used at all.
1. Screen the patient for contraindications to TMS using the Safety Checklist for VERIFY
-
- Complete the checklist as soon as the patient has consented
- If the patient is contraindicated for TMS they cannot be enrolled in VERIFY unless they have already had their study-specific MRI. If the patient has had their study-specific MRI already they are considered enrolled into VERIFY and should complete all subsequent study assessments but without TMS testing.
- If the patient is not contraindicated for TMS then a physician, physician’s assistant, or nurse practitioner of the patient’s care team should be contacted on the day of the test to check that it’s still appropriate to go ahead with the test
2. TMS can be carried out between 72 and 168 hours post-stroke.
3. TMS can be carried out in the patient’s bed space, in a procedure room, or similar location.
-
- The patient can remain in bed in a supine or semi-reclined
- The patient can be seated in a chair or wheelchair
- The patient should be relaxed and comfortable, with their arms supported on pillows and hands resting with semi-flexed digits
4. Describe the test to the patient.
-
- Explain that TMS is painless and non-invasive, and that a member of their medical team has checked that it is safe for them to have this test.
- Explain that you will hold a plastic-covered device gently against their scalp, and it will create a very brief magnetic field that can activate the area of the brain that controls their hand and arm.
- Explain that the device makes a click sound, and they are likely to feel a light tap on their scalp each time it creates the brief magnetic field, but that it won’t be uncomfortable.
- Explain that you will start at a low level of stimulation, and gradually increase it, while moving the device around to find the best position for sending a message to their weaker hand and arm.
- Explain that may feel a brief twitch in their hand and arm muscles, which won’t cause any discomfort.
- Explain that you will stick some sensors to the skin on their hand and arm, to detect the activity once it arrives at their muscles.
- Explain that they can let you know if they have any concerns or feel uncomfortable at any stage, and the test can be stopped at any time.
5. Use surface electromyography (EMG) to record from the paretic extensor carpi radialis (ECR) and first dorsal interosseous (FDI) muscles.
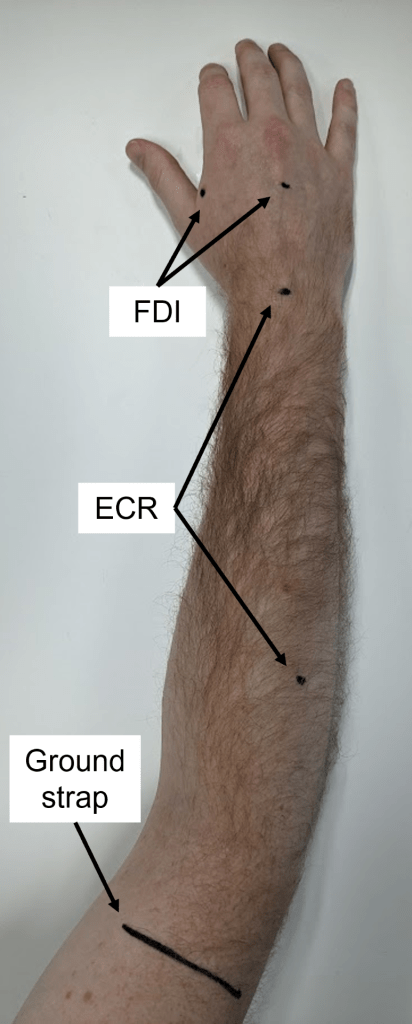
- The belly of each muscle can be located by palpation; it may help to ask the patient to try squeezing their paretic hand.
- The ECR electrodes are positioned in a belly-tendon montage, with one over the muscle belly and the other over the dorsal surface of the wrist, centred between the radial and ulnar styloid processes.
- The FDI electrodes are positioned in a belly-tendon montage, with one over the muscle belly and the other over the dorsal surface of the hand.
- A ground electrode is positioned over a bony area, such as the dorsum of the hand or lateral epicondyle of the humerus.
- If a ground strap is used instead of a ground electrode then it should be placed around the distal end of the humerus just proximal to the elbow joint, and be snug but not tight.
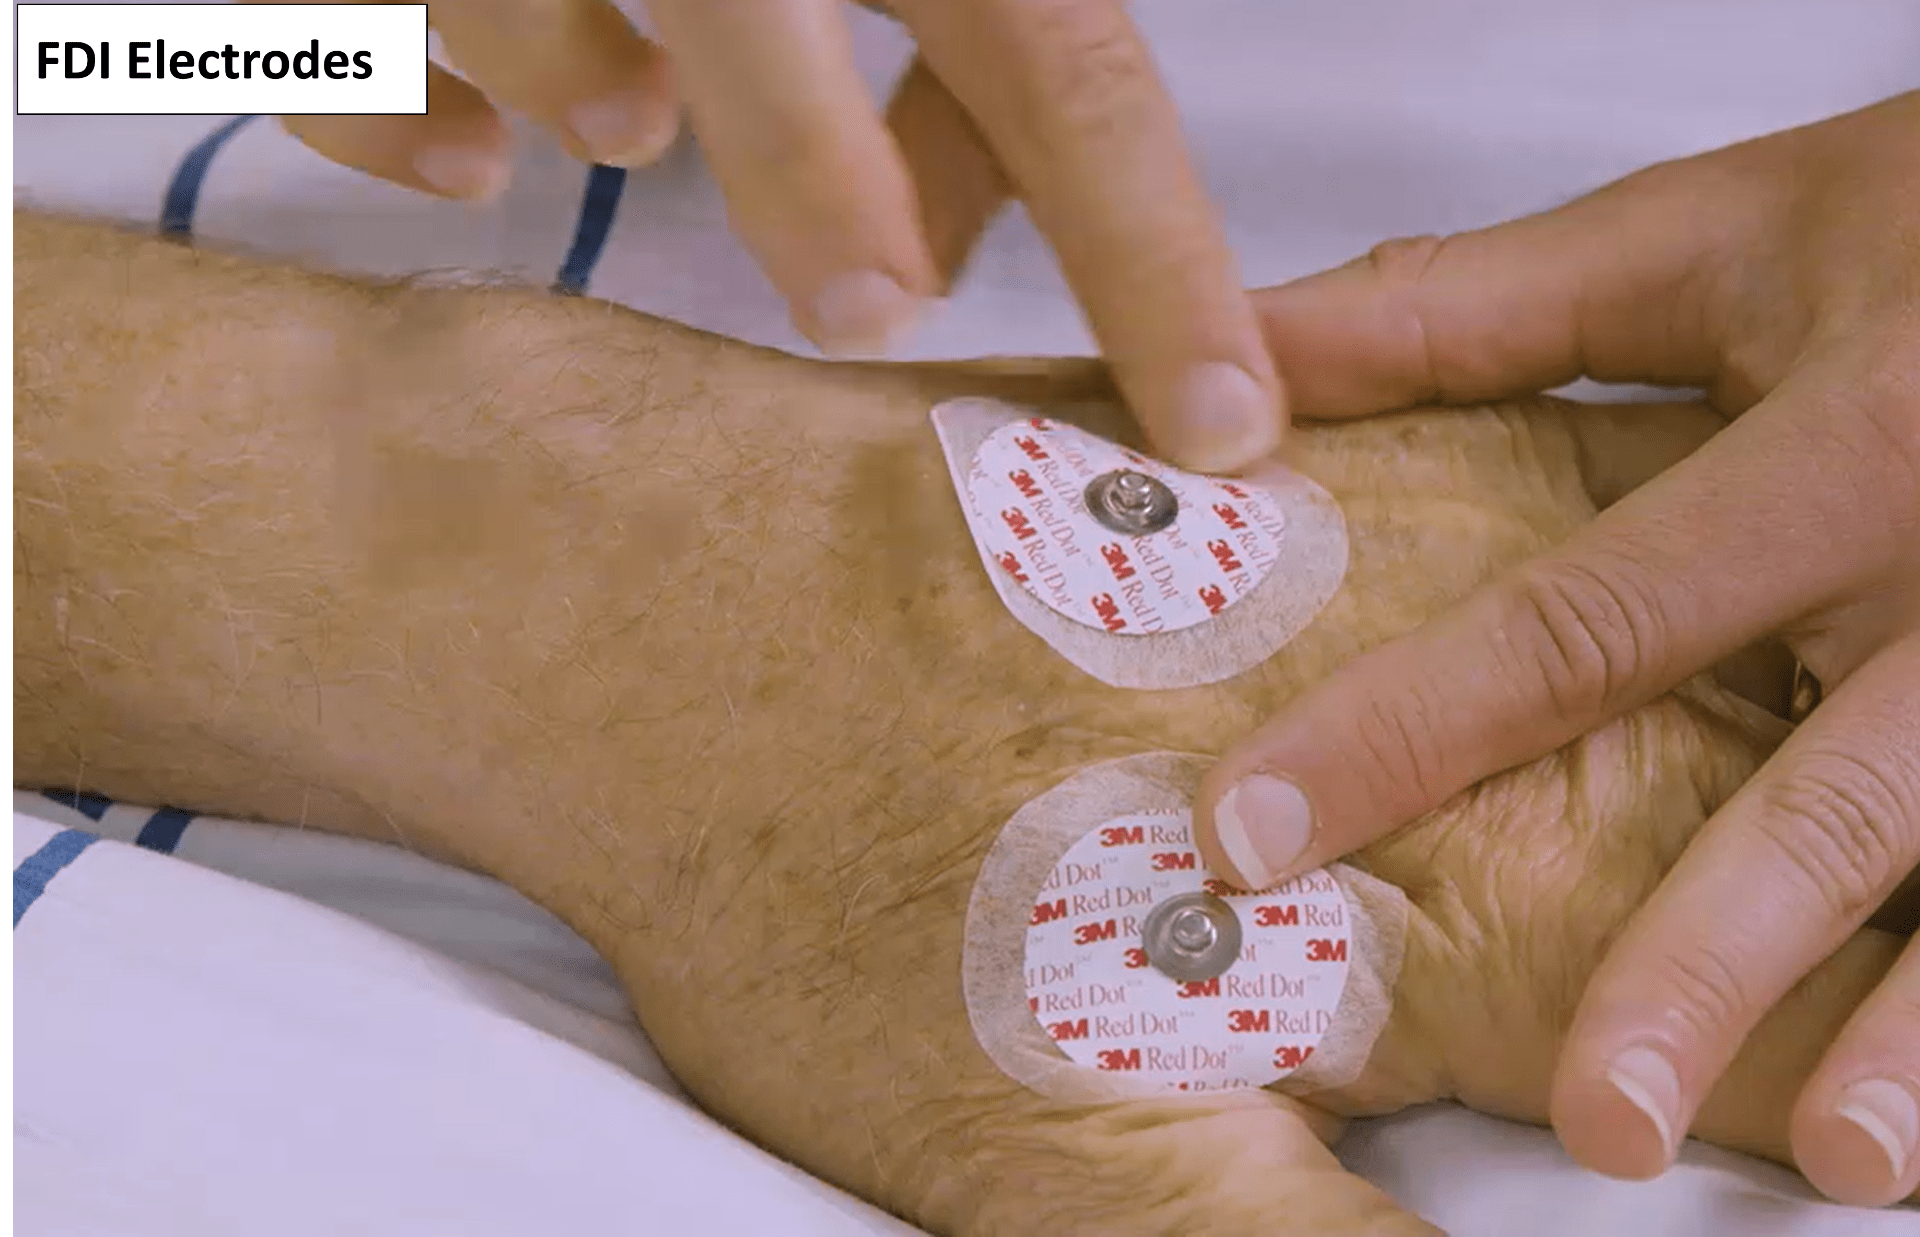
- Use either self-adhesive disposable recording electrodes, or re-usable metal cup electrodes filled with conductive gel or paste and securely taped to each site.
- The skin overlying each electrode site needs to be prepared by shaving to remove any hair, cleaning with an alcohol wipe, and light abrasion with either prep cream or prep tape. This helps reduce noise issues with the EMG.
- Take particular care when preparing patients with fragile skin, and avoid placing electrodes over any areas of broken skin.
- Once the electrodes are applied, connect the EMG cables so that the ECR muscle is on channel 1 and the FDI muscle is on channel 2.
- Ensure that the signal is free from biological and non-biological noise, so that motor evoked potentials (MEPs) can be readily detected.
- If you are using a MEGA-TMS TMS machine you can check the impedance of the EMG electrodes, and identify any with high impedance that need to be re-prepared.
- If the patient is finding it difficult to relax the recorded muscles, it can be helpful to ask them to relax and drop their shoulders, as well as assisting them to reposition their hand and arm to find a posture that enables muscle relaxation.
- The signal can be sampled at a minimum of 2 kHz and filtered with a 5 or 10 Hz high-pass and 1000 Hz low-pass filters.
- The EMG equipment needs to be triggered by the TMS unit, such that the EMG trace is at least 25 ms in duration prior to each magnetic stimulus, and another 50 ms in duration following each magnetic stimulus.
6. Demonstrate the TMS device to the patient.
-
- Show the patient the TMS coil and discharge it while holding it away from them, so they can hear the click.
- Position the TMS coil over the stroke affected hemisphere, so they can feel what it is like.
- Let the patient know you will give them one ‘click’ as a ‘tester’, then deliver one stimulus at 30% maximum stimulator intensity (MSO), then check with the patient that they are comfortable to proceed with the rest of the test.
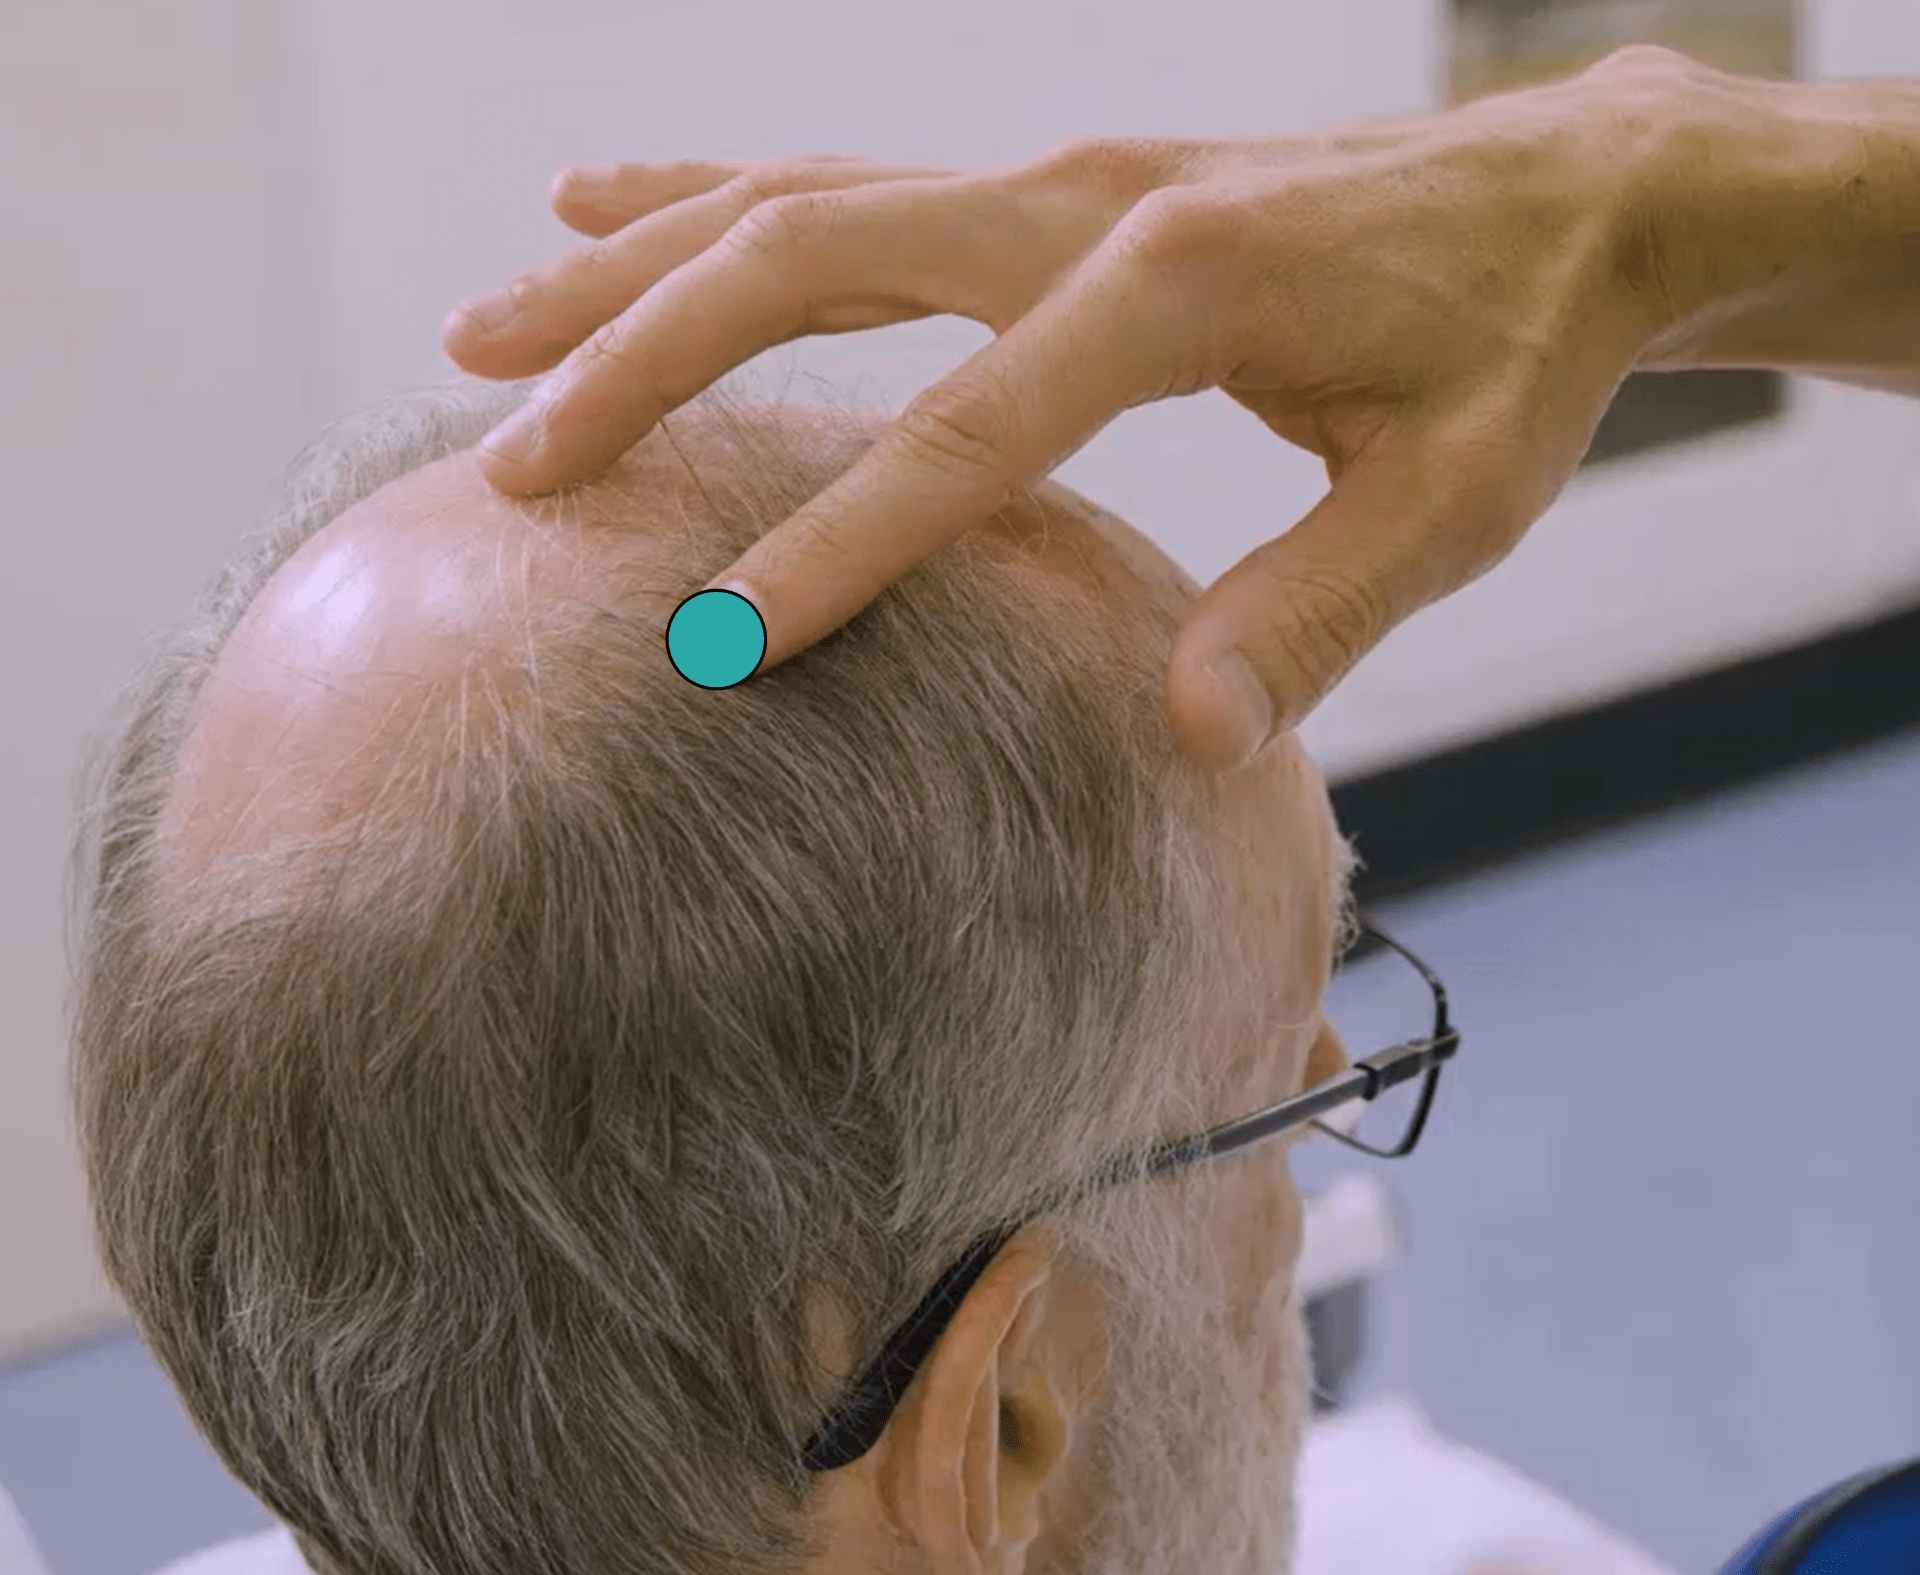
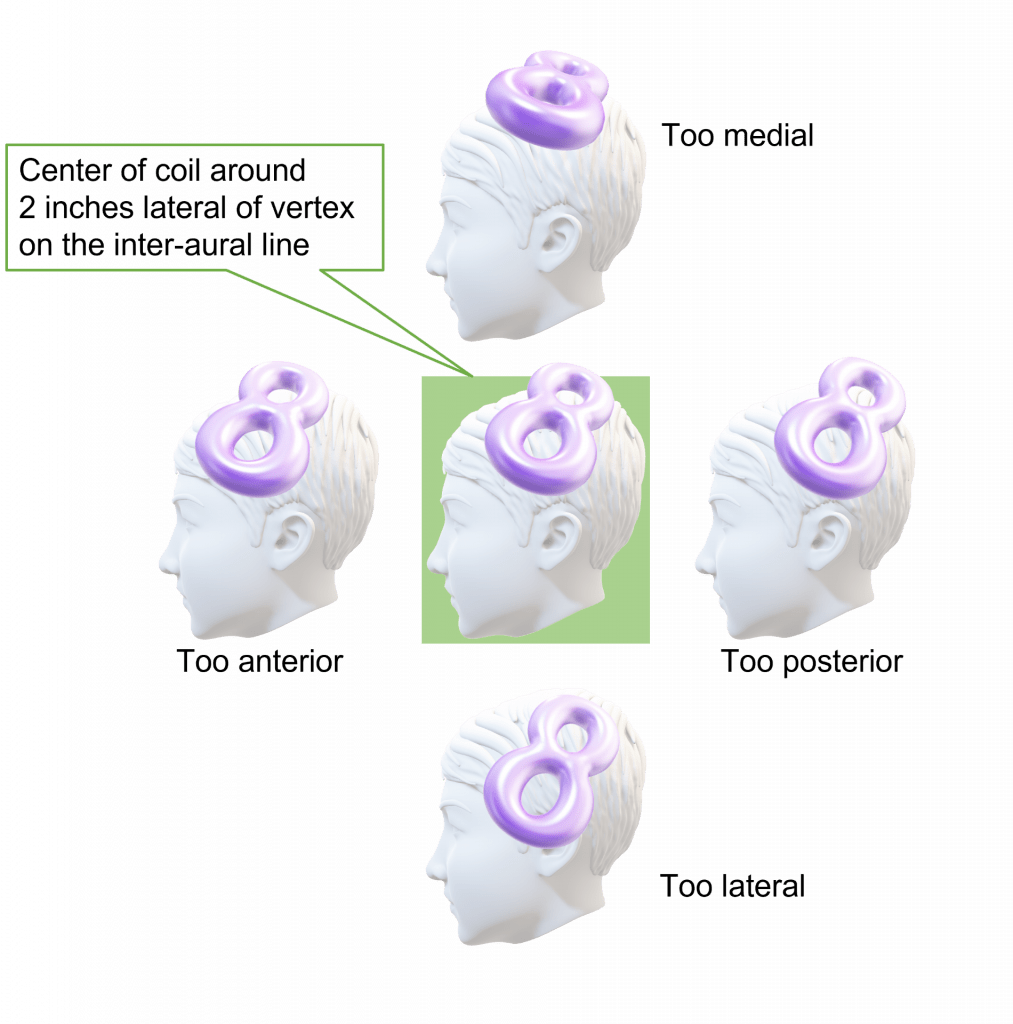
7. Position the focal point of stimulation over the stroke affected hemisphere, approximately 2 inches lateral to the vertex on the inter-aural line. This position is shown with the blue circle in the picture on the left below.
-
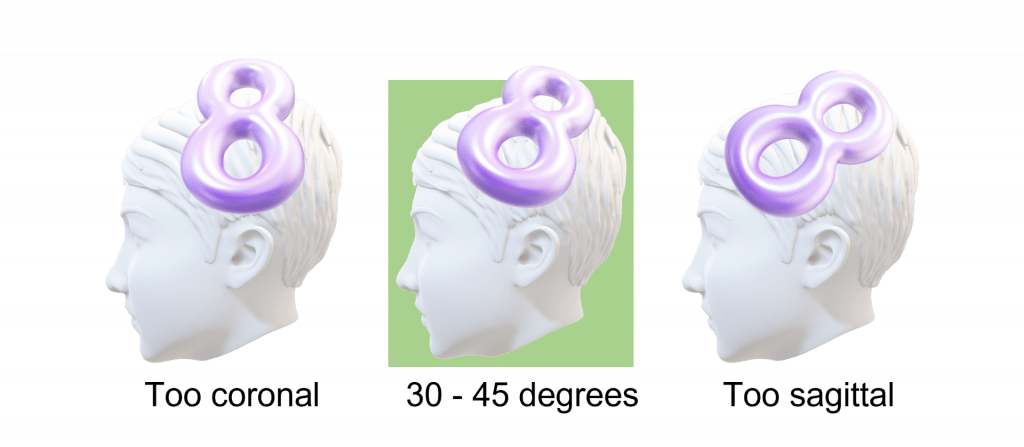
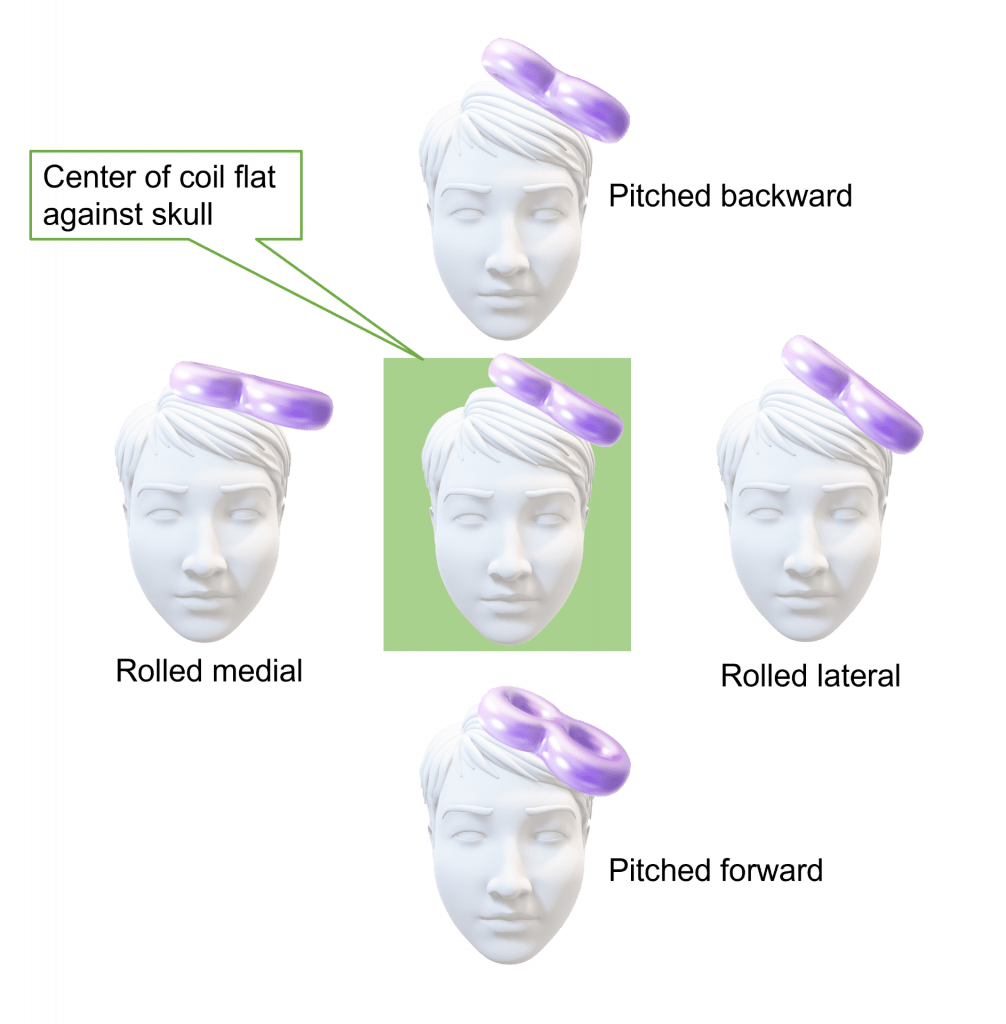
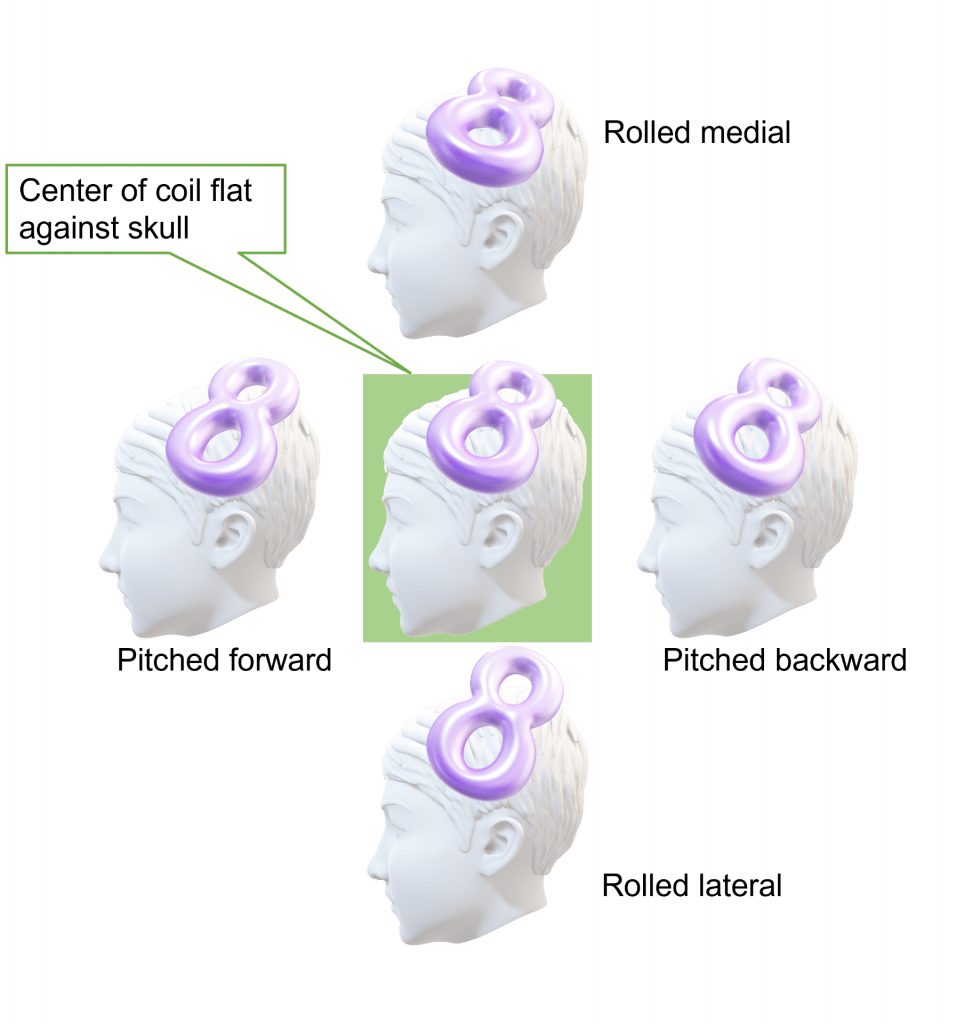
- Ensure the coil is oriented to produce a posterior-to-anterior current flow in the underlying cortex. For a figure-of-eight coil this means having the handle pointing towards the back of the patient’s head, and at an approximately 30 – 45° angle to the mid-sagittal plane. This orientation is shown in the picture on the right below.
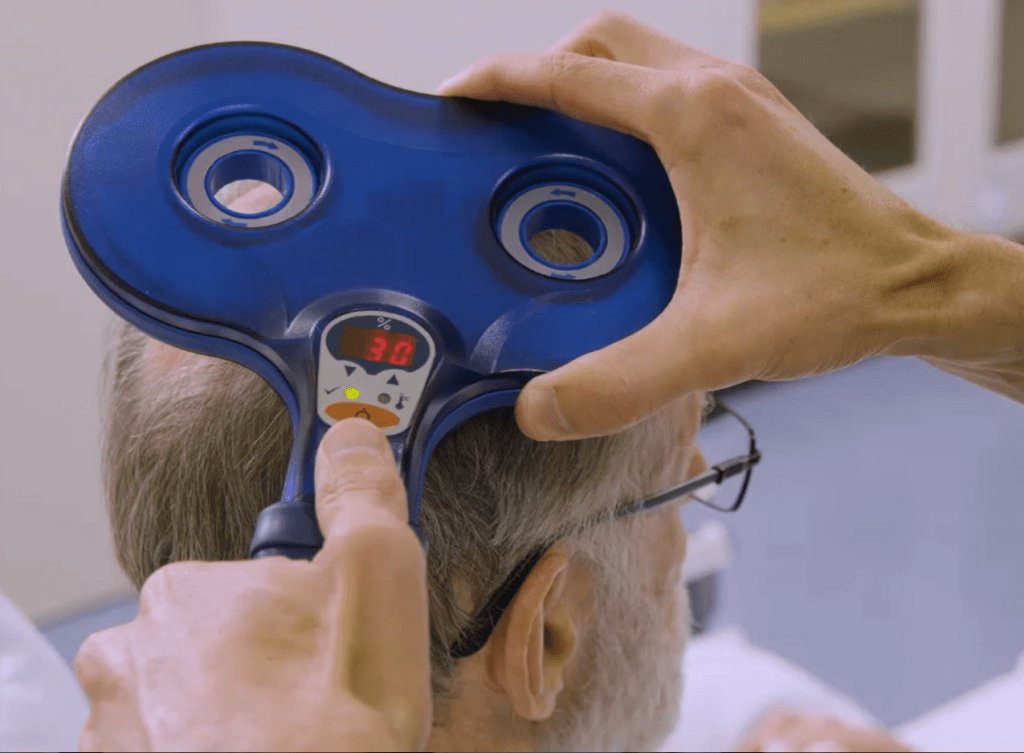
Below are some diagrams showing correct coil position and orientation, along with common positioning errors. Further examples of correct and incorrect coil positions can be found on the EMG and TMS training videos page.

8. Begin with the stimulus intensity at 30% MSO, and increase it in 10% MSO steps, delivering approximately 3 – 5 stimuli at each intensity and scalp location.
-
- Systematically move the coil in approximately half-inch steps (anterior, posterior, medial, lateral) when trying to find MEPs with a given stimulus intensity.
- If you see a MEP or MEP-like response then you should hold the coil in that position and deliver 9 more stimuli at that same intensity. If you see MEPs in one or both muscles in at least 3 out of 10 traces then the patient can be classified as MEP+ and you have finished the test. For example, if you see an FDI MEP in one trace, and ECR MEPs in two other traces, the patient is MEP+ because you have observed MEPs in 3 out of 10 traces. In this situation, you would also tick “both muscles” on the source document where it asks which muscles you observed MEPs in.
- If you cannot see MEPs in one or both muscles in at least 3 out of 10 traces at any coil position with that intensity, then increase the stimulator intensity by 10% MSO and go back to step 8a.
- Repeat steps 8a-c until you observe MEPs in 3/10 traces at a given intensity and the patient is classified as MEP+, or until 100% MSO is used.
- If no MEP is observed at 100% MSO while the participant is at rest then you should ask the patient to perform active bilateral facilitation. Ask the patient to hug a pillow to their chest, using both upper limbs, attempting to activate the muscles of both upper limbs and hands to the greatest possible extent. An example of bilateral facilitation being performed can be found in a video here.
- You need to see just one MEP in at least one muscle to classify the patient as MEP+ if they are performing bilateral facilitation while you systematically move the TMS coil at 100% MSO. If no MEPs are observed at 100% MSO with bilateral facilitation and systematic coil movement then the patient is classified as MEP-.
- If you get the sense the patient is uncomfortable and may ask to stop the TMS session prematurely, you have the option to skip remaining intensities and move straight to 100% MSO with active bilateral facilitation. This will hopefully allow you to determine MEP status without needing a second TMS session.
- You would still need to perform systematic coil positioning by delivering at least 1 stimulus at a minimum of 5 different scalp sites at 100% along with bilateral facilitation to be sure the patient is MEP-.
- Remember you only need one MEP in one muscle to confirm MEP+ status at 100% MSO with bilateral facilitation.
- Monitor the EMG trace throughout testing and take steps to eliminate any biological or non-biological noise that arises.
9. The patient is classified as
-
- MEP+: if MEPs are observed in one or both muscles in 3 out of 10 traces at a given intensity. ECR MEP latency is ≈ 15 – 25 ms, and FDI MEP latency is ≈ 20 – 30 ms. Only one MEP in either muscle is required at 100% MSO with bilateral facilitation.
- MEP-: if MEPs are not observed with bilateral facilitation at 100% MSO while systematically moving the TMS coil. If no MEPs are present but you haven’t attempted (1) 100% MSO and (2) bilateral facilitation and (3) systematic movement of the TMS coil, then the MEP status is indeterminate.
- If you are not able to accurately determine MEP status during a TMS session, then you should do all you can to reschedule a TMS session later if it still falls within the 72 – 168 hour post-stroke window.
- Any VERIFY patients without a usable MEP status determination will have to be excluded from the study primary analysis.
10. Once the test is complete, save the complete EMG data file including all traces from the TMS session. Submit the EMG file to WebDCU and complete the TMS CRF on WebDCU using information from the TMS source document. If there are multiple EMG files from the same TMS session please zip them together as only a single file can be uploaded to WebDCU. Please write names exactly as they are listed on the DOA.
11. Remove the recording electrodes and clean the underlying skin with an alcohol wipe.
-
- ‘Remove’ wipes (Smith and Nephew) can be used to gently remove adhesive tape and electrodes from patients with fragile skin.
- Any reddening of skin prepared for EMG will resolve and does not usually require treatment.
12. Clinically monitor the patient at 15 and 30 minutes after TMS is completed.
-
- TMS is complete after the last stimulation is delivered to the patient.
- These checks involve observing their level of alertness and looking for any repeated involuntary or unexpected movements of their limbs.
- A seizure during TMS or within one hour of TMS completing is an adverse event of special interest.
- All adverse events must be recorded according to the VERIFY study protocol.
- Further details of how to monitor and manage the potential for adverse events is provided in module 7.
Quiz
Click here for a quiz to assess your learning on the VERIFY TMS Protocol.
Once the practice quiz has been completed with at least 70% correct you will be emailed a link to the final quiz for this module.
If you pass the final quiz with at least 80% correct you will be emailed a certificate of completion for the VERIFY TMS Protocol module. There is no limit to the number of attempts for the practice or final quiz.
Please email verify.study.tms@gmail.com if you have any questions or comments.
If you require urgent assistance or advice during a TMS session please call or text the TMS hotline at: (833)337-2227 (Available Mon-Fri 8am-9pm ET)