If you require urgent assistance or advice during a TMS session please call or text the TMS hotline at: (833)337-2227 (Available Mon-Fri 8am-9pm ET)
The VERIFY TMS protocol can be quickly accessed here.
If you are not able to accurately determine MEP status during a TMS session, for example because the patient becomes fatigued during it and requests to stop, then you should do all you can to reschedule a TMS session later if it still falls within the 72 – 168 hour post-stroke window. Any VERIFY patients without a usable MEP status determination will have to be excluded from the study primary analysis.
Overview
Once you have determined MEP status the EMG file containing all the TMS traces recorded during the session should be exported and uploaded onto WebDCU. Please write names exactly as they are listed on the DOA.
The VERIFY TMS Safety Checklist can only be completed with stroke patients by a trained VERIFY staff member who has received a certificate for completing the TMS Safety Checklist module. This requires passing the practice and final quizzes at the bottom of this page.
Occasionally TMS data may not save correctly which means the central VERIFY TMS team is unable to make a MEP status determination and the data will be unusable. Please ensure that when you finish a patient TMS session and save the data, that you quickly open and check the data looks correct because if the data didn’t save correctly or traces are missing then you can quickly re-test the patient as they are still present and prepped for TMS.
There are several parts of the TMS protocol you likely didn’t practice with healthy volunteers, which you need to remember for stroke patients:
-
- Stroke patients and their families could be apprehensive about TMS compared to healthy volunteers so remember that the way you approach the test has a large influence on the patient’s experience. If you express feelings of uncertainty or concern about the test, then they will too. Remember that TMS is a safe, painless technique that is well-tolerated, even by people at the acute stage of stroke. Being confident and calm will make TMS a straightforward test for everyone involved.
- On the day of the TMS test, check with a member of the patient’s clinical team to see if there are any changes in the patient’s status that you should be aware of, particularly seizure, medical instability or neurological deterioration. You can check with a physician, physician’s assistant, or nurse practitioner, and add their name to the top of the TMS data collection form.
- The patient must remain blinded to whether they are MEP+ or MEP-. This means the TMS Operator and Assistant will have to communicate without directly discussing MEP status in front of the patient, and that the patient is not able to see the EMG traces during TMS testing.
- All stroke patients need to be clinically monitored at 15 and 30 minutes after TMS is completed. These checks involve observing their level of alertness and looking for any repeated involuntary or unexpected movements of their limbs. Further information for clinical monitoring is provided in the instructions on the TMS source document, and as point 13 of the TMS protocol.
- To classify a patient as MEP- you need to check that no MEPs can be elicited while attempting all of the following together:
-
- Increasing stimulator intensity to 100% MSO, and
- Participant performing bilateral facilitation
- Systematic movement of the coil to search for the optimal stimulation location which means stimulating at least 5 different scalp locations
-
- If any of these are not performed then a patient cannot be called MEP- and they will have an undetermined and unusable MEP status.
You can see a short video on using TMS with stroke patients in hospital at the link below, if your institution has access to the Journal of Visualised Experiments (JoVE). There are several important differences between the VERIFY TMS protocol and the protocol in the video:
- Five MEPs are not needed to classify someone as MEP+ in VERIFY as indicated in the published video.
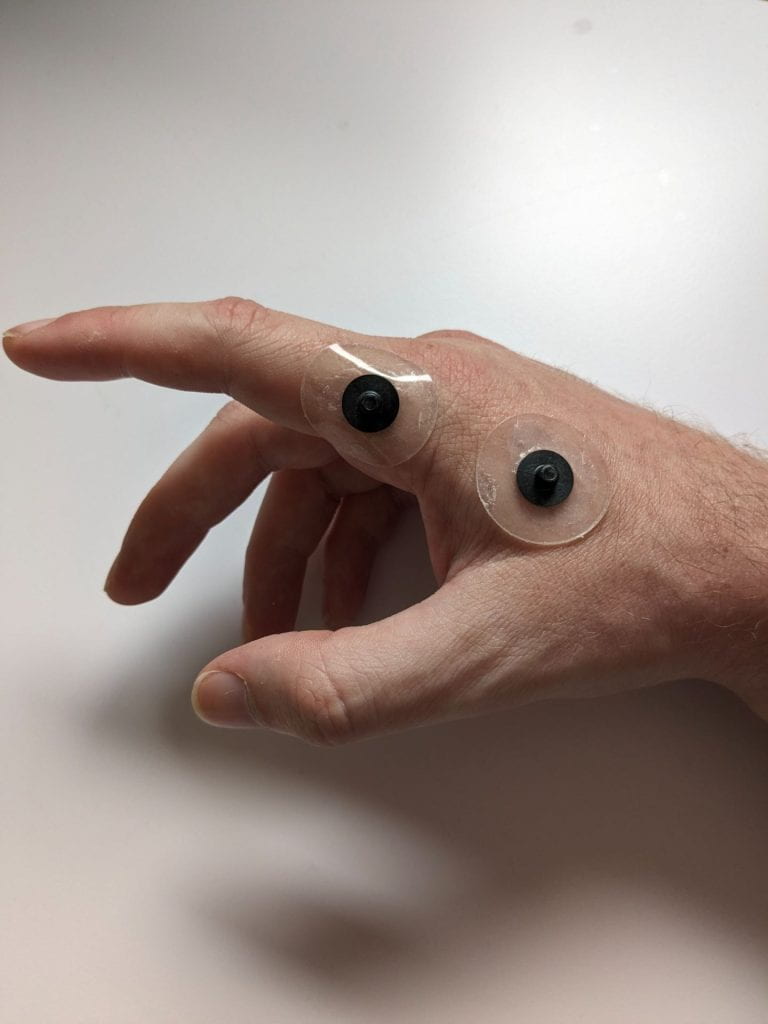
- ECR electrodes are placed in a belly-tendon montage for VERIFY, not both over the muscle belly as in the published video.
https://www.jove.com/t/60665/determining-functional-status-corticospinal-tract-within-one-week
Bilateral Facilitation
If you get to 100% stimulator intensity and haven’t seen any MEPs, you need to ask the patient to try activating their arm muscles while you deliver stimuli at 100%. This is called “bilateral facilitation”, and must be done before a patient can be called MEP-. Bilateral priming is used because MEPs are easier to elicit when the muscle of interest, or the contralateral muscle of interest, is active compared to at rest. It is unlikely you needed to practice bilateral facilitation during healthy volunteer training because people without strokes will be MEP+ without needing to facilitate.
Bilateral facilitation involves asking the patient to hug a pillow to their chest, using both upper limbs, attempting to activate the muscles of both upper limbs and hands to the greatest possible extent. If the patient’s paretic upper limb has no movement at all then get the patient to hold and squeeze it using their non-paretic upper limb.
Below is a video demonstrating a participant performing bilateral facilitation while being stimulated. Please note how the TMSO in the video is encouraging the patient during bilateral facilitation, and the TMSO is moving the coil around on the participant’s head during the 3 stimulations.
It is important to emphasize that TMS should be delivered during the participant’s bilateral facilitation, not after it.
Information for how to perform bilateral facilitation is provided in the instructions on the TMS source document, and as point 8E of the VERIFY TMS protocol.
Here are some suggested instructions to give to participants for bilateral facilitation: “Okay, now we’re going to do some stimulating with you trying to activate both your hands and arms. I want you to hug this pillow to your chest as hard as you can and try to maximally activate all the muscles in both your hands and arms while pulling your shoulder blades backwards as well. I want you to give 110% effort. While you’re activating your muscles I will give you a stimulation and it may make you jump a bit more than the previous stimulations. When I say ‘go’ I want you to maximally activate both your hands and arms and I will deliver 3 stimulations in a row, then you can rest.”
Occasionally electrical noise or a prolonged stimulus artefact can occur in trials once the patient starts performing bilateral facilitation. These issues are usually caused by the patient tugging on the electrodes and/or cables during bilateral facilitation. This can be solved by changing the position of the cables or the patient’s upper limbs to ensure the patient performs bilateral facilitation in a way that doesn’t tug on the electrodes and/or cables.
MEGA-TMS Users
Please visit the MEGA-TMS Information page for downloads for the MEGA-TMS software and settings, orientation to the MEGA-TMS software, and instructions for exporting TMS data.
The MEGA-TMS Software and VERIFY Settings can be downloaded from either of the following links:
Instructions for Installing MEGA-TMS Software and Settings – Should be used if you need to reinstall the MEGA-TMS software on the supplied laptop or install the MEGA-TMS software on a new laptop. If you cannot access the PDF for any reason the instructions can also be found at the bottom of the MEGA-TMS Information page.
Instructions for VERIFY Laptop Hard Reset and Software Installation – Should be used if the VERIFY laptop is running extremely slowly or takes an extended period of time to load past the black start-up screen when you turn the laptop on.
Tips for TMS with stroke patients
Here are some tips for setting up patients for TMS testing, and a copy of them can be downloaded from here.
Remember to check in with a member of the patient’s clinical team before getting started, there are notes about this on Form 510 in the Studybook.
Performing TMS at high stimulus intensities
Some patients find TMS uncomfortable at high stimulus intensities so it is important you and the TMS assistant help them feel more comfortable. This will help prevent the patient asking to stop the TMS session before MEP status can be determined. Some tips include:
- Be selective with your choice of words. For example when using 100% MSO stimulation with stroke patients you could say “this is the strongest click we’ll be using today” or “we won’t be going any higher than this” which is much softer than phrases like “we’re at 100% intensity” or “we’re at the highest intensity possible.”
- Offer the patient earplugs as a source of discomfort from TMS can be the sound of the TMS click. Earplugs aren’t included in the VERIFY budget but you have some at your hospital already and they’re very cheap.
- Give the participant breaks between stimulations if necessary.
- Have the TMS assistant keep an eye on the patient to offer encouraging words and see if the patient needs a break.
- Give the patient a set number of stimulations left as this can help them see an end in sight and make them more willing to finish the session. For example if you are at 100% MSO with bilateral facilitation you might say “you’ve done a great job so far, we’re so close to the end so is it okay if we do 8 more stimulations while you squeeze both hands? Then we’ll be all done and can stop the testing.”
- Be confident and calm because the way you approach TMS has a large influence on the patient’s experience. Remember that TMS is a safe, painless technique that is well-tolerated, even by people at the acute stage of stroke. Being confident and calm will make TMS a straightforward test for everyone involved.
If the patient is in bed during testing
- Set the bed up so the patient is sitting as upright as tolerable.
- Raise the bed under their knees so they don’t slide down the bed during testing.
- Lower the bed height so you can more easily position the coil on their head. You might also need a small step to stand on so you’re not having to reach upwards with the coil.
- You may need to move the patient towards the side of the bed where you will be standing, again to help you more easily position the coil on their head.
- Place pillows behind their back to create space between the top of their shoulders and the bed – this will give you more room for the coil handle and cable.
- You can place the EMG box, which the EMG cables plug into, on the bed next to the patient’s paretic upper limb.
- If the EMG trace is contaminated by electrical noise you can try unplugging the bed and ensuring the patient isn’t touching any metallic parts of the bed, to reduce electrical noise from the bed itself.
If the patient has IV lines and/or supplemental oxygen
- You can test a patient while they are receiving supplemental oxygen
- Take care around IV lines, ensure they do not become tangled with any cables
- Jewelry, watches, and ID bracelets can stay on the paretic upper limb, they won’t interfere with the EMG signals.
- If they have an IV line in the back of their paretic hand, take particular care with setting up the EMG electrodes in this area. You may need to modify the position of the FDI reference electrode, for example to the lateral surface of the
If the patient has a hearing aid, sensitive hearing and/or fragile skin
- Ask the patient to remove their hearing aid if it is on the same side of their head where you will place the TMS coil. Patients can keep their glasses on during testing.
- Some patients can find the ‘click’ noise made by the TMS machine a bit stressful, particularly if they have sensitive hearing. Offer them ear plugs, they may need help to insert them.
- Some patients have fragile skin, so take care during skin preparation for EMG, and when removing the EMG electrodes. You can use Re-Move Adhesive Remover wipes (Smith & Nephew) to gently dissolve the adhesive and remove the electrodes without pulling on the skin.